Patio Installation Techniques for Seamless Outdoor Living
A patio can completely change how a North Texas home feels—until you notice the first low spot after a heavy rain. In McKinney, we see it often: a “pretty” patio with nice joints and color that starts to pond water. A season later, you get uneven settling, hairline cracking, and edges that slowly pull away from the house or adjacent walkways.
That’s why patio installation isn’t just about pouring concrete and picking a finish. The real difference between a patio that looks great for years and one that fails early is site preparation, grading, drainage planning, and the way the slab interfaces with the rest of the property.
If you’re planning a new patio or replacing an older one, this guide walks through the techniques that make outdoor living feel seamless—visually and structurally—especially in North Texas conditions.
Quick Answer
A long-lasting patio in McKinney typically requires: correct subgrade prep, proper base thickness and compaction, a drainage-forward grade away from the home, and expansion/joint planning to handle soil movement. If the patio will connect to existing concrete, the transition details matter just as much as the finish. Most “early failure” problems come from inadequate grading and base preparation, not the concrete mix or the surface design.
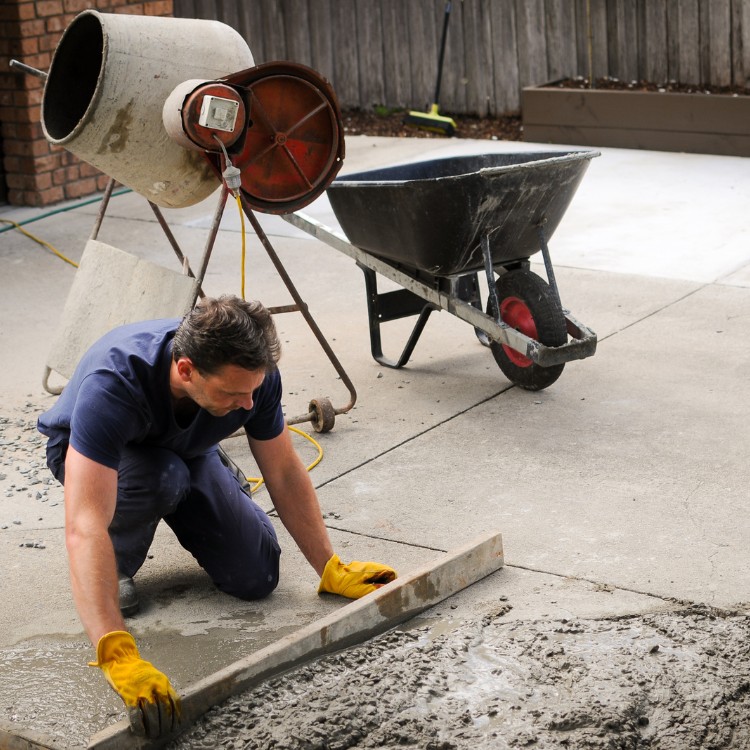
Concrete Patio Installation: The Techniques That Actually Hold Up
1) Start with site evaluation, not the pour day
Before we talk about stamped concrete patios, concrete flatwork layout, or finishes, we evaluate how water moves across the site. A patio that drains poorly will settle unevenly—even if the concrete is installed correctly.
We typically look at:
- Existing slopes and where runoff goes during storms
- Soil behavior (expansive clay can expand and contract with moisture)
- How the patio ties into concrete foundations, sidewalks, or driveways
- Whether downspouts or irrigation lines will discharge toward the slab
If water is going to collect anywhere near the patio, we address it before concrete goes in. Otherwise, the slab becomes the “catch basin,” and you’ll feel it later in the form of rocking edges and recurring repair calls.
2) Base prep and compaction: the foundation of the foundation (for patios)
For concrete slab installation, the base isn’t optional. A patio slab relies on the support below it. In North Texas, clay subgrades can soften when moisture changes, so we focus on:
- Removing unsuitable topsoil and organic material
- Adding the right base material in lifts
- Compacting to the proper density for stability
One firsthand observation from the field: we often see homeowners scheduling “concrete work” as if the slab is the main event. But most early cracking and unevenness starts because the base wasn’t built to resist seasonal moisture and traffic loads (even light foot traffic can expose weak subgrade when it’s wet).
3) Grading details: build the slope for drainage, not guesswork
A common mistake we run into is a patio that “looks level” because the surface was set that way. Visually level isn’t always functional. The goal is to provide a controlled slope that moves water away from the home and toward a defined drainage point.
For many patios, that means a gentle, consistent slope across the slab with attention to low points near:
- Door thresholds
- Existing concrete walkways
- Where the patio meets a retaining wall or landscaped beds
If you’re also planning related work—like pathways or transitions—this is where coordination matters. For example, if you’re updating concrete walkways at the same time, it’s easier to design one continuous drainage plan rather than patching grades later.
If you need a broader foundation context for the rest of your property, you may find this helpful: Slab Foundations.
4) Expansion joints and control joints: the “stress management” system
Concrete expands and contracts. In Texas heat and seasonal moisture swings, that behavior is amplified. The right joint strategy is what helps a patio crack where you expect it to—rather than randomly.
We plan joints based on:
- Patio dimensions and layout
- Connections to existing concrete
- The likelihood of differential movement in adjacent areas
- Whether the patio is stamped concrete patios or a smoother finish
A properly planned joint layout helps keep the slab looking intentional for the long run.
5) Edges, borders, and interfaces: where patios usually fail first
Edges and transitions take the most stress:
- Where the patio meets the house or steps
- Where it meets existing flatwork
- Around posts, planters, and changes in elevation
We use details that reduce water intrusion at interfaces and prevent soft subgrade from forming under edges. If the patio is replacing existing concrete, driveway replacement or removal logistics matter too—especially when the old slab left voids or disturbed the base.
If your patio ties into a driveway area or you’re replacing nearby pavement, it’s worth reviewing Driveways so the grade and drainage transitions match.
6) Finishes: stamped concrete patios and concrete sealing go together
Stamped concrete patios can look incredible, but the surface still needs protection. Textured finishes can hold moisture longer in shaded areas, and color can fade without the right maintenance plan.
That’s why we often recommend concrete sealing after installation and proper curing. Sealing isn’t just about appearance—it’s about reducing moisture absorption and making the surface easier to maintain.
Also, if you’re considering decorative features like steps or changes in elevation, we coordinate those details before the slab is poured so the finished transitions don’t create “trip zones” or water traps.
What Property Owners Often Overlook
Common mistake: assuming the slab finish determines durability
Many homeowners focus on visual details—color, stamp style, border patterns—while overlooking the work underneath. The finish can be flawless and still fail early if:
- The base isn’t compacted properly
- The grade doesn’t direct water away from the home
- Joints aren’t planned for the patio size and layout
- The interface with existing concrete isn’t handled correctly
Another frequent issue we see: connecting a patio to existing concrete without addressing the transition. If one area settles slightly due to subgrade conditions, the connection becomes a stress point. Over time, you’ll see cracking or separation—not because the concrete “is bad,” but because the system wasn’t designed as a system.
Signs Concrete Needs Repair (Before a Small Issue Becomes a Bigger One)
If you already have a patio (or are dealing with one before replacement), watch for:
- Hairline cracks that widen after rain
- Areas that stay wet longer than the rest of the patio
- Uneven edges you can feel with your feet
- Separation near the house or along walkways
- Efflorescence (white residue) that keeps returning after cleaning
When you catch these early, repairs are often more manageable. When you ignore them, the underlying issue usually involves grading, drainage, or subgrade moisture changes that keep pushing the slab out of plane.
Site Preparation Checklist for a Seamless Patio Install
Use this as a practical “pre-pour” checklist. A good installation starts long before the truck arrives.
Site & drainage
- Confirm water flow direction during rain events
- Check downspouts and irrigation patterns relative to the patio area
- Plan where runoff will go (and avoid sending it toward foundation edges)
Subgrade & base
- Remove unsuitable soils and organic material
- Add base in lifts and compact consistently
- Verify base thickness and uniform support across the slab footprint
Layout & slab details
- Set forms and elevations with a consistent slope away from the home
- Plan joints (control joints and expansion joints) for the patio dimensions
- Design transitions to existing concrete (walkways, steps, driveway edges)
Pour & finishing
- Use appropriate concrete mix for exposure conditions
- Finish for durability (not just appearance)
- Cure properly and schedule sealing when appropriate
If your project involves other sitework—especially where drainage gets complicated—consider reviewing Foundation Grading to understand how grading decisions impact long-term performance.
A Realistic North Texas Project Case (Anonymized)
A homeowner in McKinney wanted a stamped patio upgrade to match their new landscaping. The existing patio had settled in one corner after a spring storm. The surface looked “mostly fine,” but water was pooling near the low edge, and cracks kept returning after heavy rains.
During site evaluation, the key issue wasn’t the concrete finish—it was the drainage path. The original grade directed runoff toward the patio, and the base under the affected corner had softened during wet months. We corrected the slope away from the home, rebuilt the base to consistent density, and planned joint placement based on patio dimensions and connections to adjacent concrete.
The result: a patio that looks cohesive with the landscaping and holds its shape through seasonal moisture swings. That “seamless outdoor living” feeling came from the construction details below the surface.
McKinney or North Texas Relevance: Why Patios Behave Differently Here
North Texas soils can be unforgiving. Expansive clay expands when moisture increases and shrinks when it dries out. Add summer heat cycles and periodic heavy rain events, and you get movement that your patio must accommodate.
That’s why we pay extra attention to:
- Moisture control through grading and drainage paths
- Base compaction and uniform support
- Joint planning for stress relief
- Edge protection to prevent water intrusion
Also, seasonal temperature changes can affect curing and long-term performance. A patio installed without a realistic schedule for curing and finishing can look good initially and still fail sooner than expected.
If your backyard project includes features that retain soil or manage elevation changes, review Retaining Walls—because retaining systems and patios often interact through drainage and foundation-adjacent grading.
Concrete vs Asphalt Comparison for Patio Areas
| Feature | Concrete Patio | Asphalt Patio/Surface |
|---|---|---|
| Long-term look | Holds color/finish well with sealing | Can fade and oxidize over time |
| Drainage behavior | Joints and slope can be engineered | Can soften and rut if base prep is weak |
| Repair approach | Cracks/joints planned; localized repairs possible | Patching can be visible and may require larger sections |
| Heat exposure | Can get hot, but consistent surface performance | Often becomes very soft in extreme heat |
For patios that need a clean, architectural look—especially with stamped concrete patios—concrete is typically the better fit when you want long-term stability and controlled drainage performance.
If your project extends beyond the patio into other flatwork areas, you may also want to compare options for nearby Sidewalks so the whole property flows smoothly.
Why Some Patio Installations Fail Early
Most early concrete patio failures in North Texas come down to a few root causes:
- Poor base preparation: weak support leads to settlement and rocking edges
- Incorrect grading: water pools, softens soils, and undermines the slab
- Missing or poorly planned joints: cracks appear where the concrete has no stress relief
- Bad interfaces: transitions to existing concrete create stress points
- No moisture plan: patio areas near foundation edges or downspouts get hit repeatedly by runoff
These aren’t “mysteries.” They’re predictable—and they’re preventable when you design the patio as part of the site drainage system.
What Actually Improves Concrete Longevity
If you want your patio to stay attractive and functional, plan for both construction quality and maintenance.
Maintenance and planning checklist (simple but effective)
- Keep the patio graded so water doesn’t pool
- Remove debris from joints to prevent moisture lock-in
- Clean with appropriate methods (avoid harsh treatments that degrade sealers)
- Reseal when needed to maintain moisture resistance
- Watch for early movement signs (widening cracks, sinking edges)
- Avoid heavy point loads in weak areas (like stacking materials right on edges)
If you’re also dealing with issues around foundations—especially if you’ve noticed interior or exterior signs—consider foundation grading support as part of a full property solution. Patio performance and foundation performance are often linked by shared drainage patterns.
Our Experience Building Concrete Systems in Texas Conditions
Working in McKinney and across North Texas means we plan for movement, not perfection. Concrete doesn’t “stay still” in expansive clay areas—it responds to moisture changes. The goal is to build a patio that responds predictably: stable base, controlled grading, properly placed joints, and details that keep water where it belongs.
That mindset is also why we coordinate sitework when other elements are involved—like driveways, sidewalks, or parking lot paving. If you’re managing a commercial property and the patio area is part of a broader site plan, we can help align flatwork with traffic and drainage needs. For example, Parking Lots and paving strategy often influence how drainage and subgrade are handled across the property.
Ready to Improve Your Property With Durable Concrete Solutions?
A seamless patio doesn’t happen by accident. If you’re planning patio installation in McKinney, start by addressing grading and drainage before the slab goes in—because that’s what determines whether your patio stays level, drains correctly, and looks great year after year.
About TopCore Concrete
TopCore Concrete provides slab foundations, retaining walls, patio installation, grading, parking lots, sidewalks, and concrete flatwork services throughout McKinney, TX and surrounding North Texas communities. We focus on durable construction, proper site preparation, long-term structural performance, and helping homeowners and businesses improve their properties with concrete solutions built for Texas soil and weather realities.